Showing posts with label tips and tricks. Show all posts

Friday, July 11, 2025

Organizing Pictures from our Vacation

I am back! Sorry I have not been posting recently. Mike and I did a 12-day vacation for our 30th anniversary which is this October. The vacation included 3 days in Prague, a Viking River Cruise along the Danube River, and 2 days in Budapest. Between the both of us we took over 2,000 photos. Since we have been back I have been working on organizing the photos in order to start scrapbooking this wonderful vacation. I thought that I would share with you how I organize my trip photos to make scrapbooking them easier. 


I currently use Adobe Lightroom to organize my photos. I created a new Lightroom catalog for the trip so I can work with just the photos from the trip. I do have a general catalog which I use to organize all my photos. I have found using this temporary catalog makes it a lot easier to tag, select for printing, and edit just the photos I want to use for a scrapbook layout.

I imported all the photos into the catalog - it is important to note that I do not Copy or Move the photos into the catalog. I only Add them which keeps them in their original location on my computer. I like to have more control over my photos this way.

Once I do the import, I start tagging the photos using Lightroom keywords. The first tag I assign is the date the photo was taken. From there I add tags like location and tour or excursion it was part of, if applicable. I also add tags like - food, travel, hotel, us, etc..

Lightroom has a great feature called "Smart Collections" where you can group photos together by using things like dates, ratings, and keywords. I created Smart Collections for each date from the trip then some additional ones for food, selfies, and the places we stayed.


After adding keywords to the photos in Lightroom I go through each Smart Collection and start to "cull" the photos by adding ratings (stars) to each one. I use this to help me weed down the photos I want to scrapbook from a place or event. I will remove the unwanted ones from the collection by changing it's selection criteria to only keep those with 3 or more stars.


Once I have done this I am ready to start scrapbooking the vacation. I will go into the Smart Collection for what I want to scrapbook and send those photos to print.

Now, you may be thinking - "I don't have Lightroom, what can I do?". Well, I have another solution for you. Before I worked in Lightroom I use to use the file folders and tags on the computer to organize my photos. I would store the photos by date and then create sub-folders by tour or event from the trip. I also used the tags and ratings functions on the computer to help whittle down my photos. You can search by tags and ratings to select those photos you want.


I have tweaked the process a bit in recent years but this is how I have been organizing my vacation photos for quite some time and all in all it works pretty well for me. How do you organize yours?


I hope you got something from my system. Thanks for stopping by!


Saturday, September 10, 2022

Coloring Irresistibles

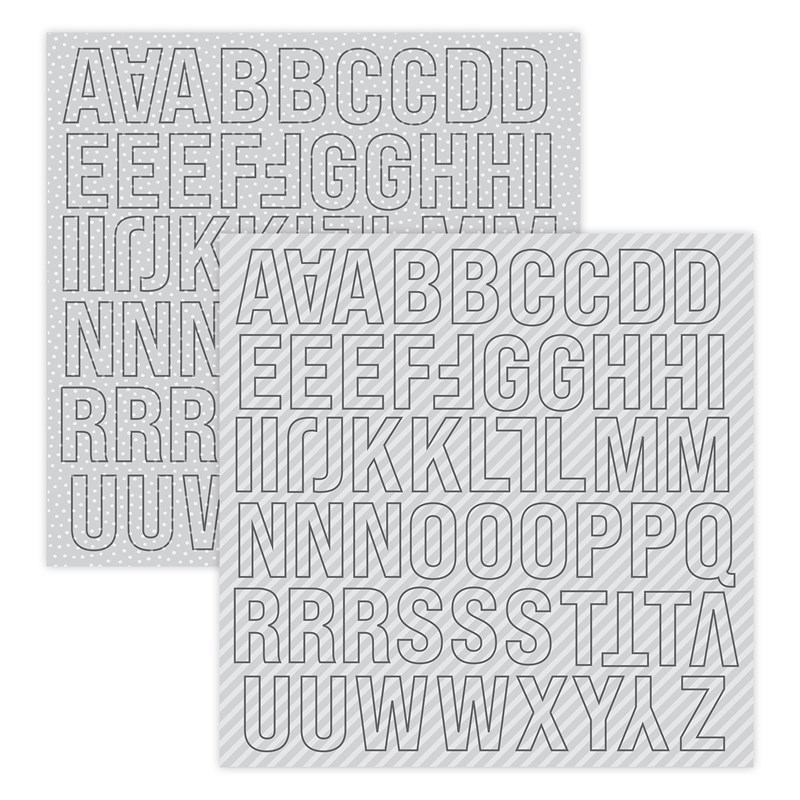
One of the fun new products from the 2022-2023 Core Catalog is the Irresistibles Collection. This collection features a cardstock pack and a letter stickers pack. These specialty pieces can be colored with ink, markers and watercolor. They feature resist patterns that show through when colored. These are a great way to add patterns to your layouts and cards in the colors you need.


The cardstock pack features 12 sheets of cardstock 2 each of 6 designs featuring checkerboard, dots, stars, plaid, flowers and diagonal stripes.


The alphabet stickers pack features 2 sheets of 1 3/4" tall letter stickers. One sheet is a diagonal stripe pattern and the other is a dot pattern.


I recently did a technique workshop to demonstrate a few ways of coloring these using some of our Exclusive Inks. 


A good basic tool set to have when working with this collection is: All Purpose Mat, Stamp Shammy, Round Sponge, Daubers and Blending Brushes. 


In addition to coloring with the Exclusive Inks you can also use Distress Oxide inks as well as markers and watercolor paints to color these. The possibilities are endless!

You can see and shop this collection on my website today here.

Tuesday, February 9, 2021

Tips & Tricks Tuesday #8 - Valentine's Shaker Treat Box

As promised, I am sharing the Valentine's Shaker Treat Box I worked on creating last weekend here with you. I had a lot of fun designing this treat box with a fun, shaker window element using the Perfect Match Collection from Close To My Heart. I am looking forward to filling each box with Valentine's treats for my family and co-workers.


I played around a bit with the dimension for the box until I got it to what I wanted. Each box measures 4" square for the base and is 2" in height. I am happy to share the instructions for you here. You can download a PDF of the instructions as well as watch a process video at the end of this post.

To create the box you will need - 1 piece of 12"x12" cardstock, 1 piece of 6"x6" patterned paper, 2 pieces of 4"x4" acetate (window sheets), sequins or other small elements for shaker, strong adhesive, 3-D foam adhesive, a scoring platform and a heart (or other shaped) die to cut out the window.


Cut the 12"x12" piece of cardstock into 1 8"x8" piece and 2 4"x4" pieces.


Score the 8"x8" piece of cardstock on all sides at 2". Fold along score lines.


Score the 6"x6" piece of patterned paper on all sides at 15/16". Fold along score lines.


Cut along score lines on 2 sides of each piece to form tabs.


For extra stability adhere one 4"x4" piece of cardstock to inside bottom of box base.


Place adhesive on outside of tabs and fold in to form box base.


Stack 2nd 4"x4" piece of cardstock on center of box lid patterned paper and using a die cut or other method, cut out window element.


Adhere 1 piece of 4"x4" acetate to underside of box lid, covering opening.


Outline opening with thin 3-D foam tape. Make sure to leave cover over tape.


Using an anti-static pouch (or dryer sheet). Wipe over window and then sprinkle in sequins or other shapes. Remove cover from foam tape and adhere 2nd piece of acetate to finish window.


Adhere 2nd piece of 4"x4" cardstock over window on the inside to hide the acetate and foam tape.


Add adhesive to tabs on outside of box lid, fold under and adhere to create lid.


Add some cardstock or other patterned paper to edge of box lid to finish it.


I finished my box with some ribbon tied around the box and a cute tag cut and stamped with images from the Months of the Year February Stamp set from Close To My Heart.

You can download a PDF with the step-by-step instructions here.

You can see the step-by-step assembly of this treat box in the following video.


I hope you enjoyed this tutorial. Thanks for stopping by!


Wednesday, December 2, 2020

Explosion Treat Box

I created these fun treat boxes for my family and my coworkers for Thanksgiving. I wanted to share the instructions here with you since this Explosion Box can be used at any time of year or occasion. I filled these with bags of candy but this box would be perfect for gift giving as well.

I am sharing pictures of the box here. You can also find a link to the printable instructions as well as a video tutorial at the end of this post.


I added a Belly Band to the box as a way of "wrapping it up" for presenting it as a gift.

Here is what the box looks like when you slide the belly band off and take the lid off. So many possibilities with this box design!


The materials needed for this box are simple: 2 pieces of cardstock plus 1 piece of patterned paper.


The cardstock for the base is cut to 11 1/4" x 11 1/4" and then scored at 3 3/4" and 7 1/2" along both the horizontal and vertical sides.


After scoring you need to cut away about 1/2" from each corner to the score lines. Cutting this away will aid in folding the corners in to create the box.


Fold this along the score lines and then fold each corner from the bottom of the box base out to the corner. You can decorate the sides with pieces of 3 1/2" x 3 1/2" patterned paper.


The cardstock for the lid is cut to 6" x 6" and then scored at 1" and 5" on both the horizontal and vertical sides.


Cut along the score lines on both horizontal sides to create tabs. Put some strong adhesive on the outside of the tabs and then fold under to create the box lid.


The belly band is made from 2 pieces of 2 1/2" wide patterned paper. One piece is left at 12" long and the other is cut down to 5 1/2" long.


Score the 12" long piece at 1 1/2", 5 3/8" and 9 1/4".  Score the 5 1/2" piece at 1 5/8". The best way to assemble the belly band is by putting it around the box as you do since you do not want the band to be too tight or too loose. I used strong adhesive on one end of each piece and once I had everything lined up I adhered the ends together.

I decorated the band at the top of the box with some Cricut cut leaves and a tag and added some ribbon and twine as well.

You can find the printable instructions here.

Here is a video tutorial I did during a recent Facebook Live.


I hope you like this Explosion Box and enjoyed the video tutorial. Thanks for stopping by!


Sunday, November 8, 2020

Your Choice Cards and a One-Sheet-Wonder

Have you ever needed a card, found one you liked but it didn't have the right sentiment? I know I run into this often so I decided to help solve this dilemma by creating a card set where you can choose your sentiment when you are ready to send the card.

I created these sets of cards recently during an event I did for National Cardmaking Day. The cards are made using a One-Sheet-Wonder technique I found on Pinterest. The technique uses a piece of 6"x6" paper to make 4 cards. Each card also has a 2" circle where the sentiment goes. I added a piece of double-sided adhesive on the back of the sentiment circle - all that is needed is to select the sentiment needed, peel off the adhesive cover and place it on the card and you are all set.

I created 6 different sets of these cards.


The card sets each come with 4 "Why Thank You", "Thinking of You" and "With Deepest Sympathy" sets of sentiments. The cards were made based off of this One Sheet Wonder Challenge diagram. You can find this diagram along with others here.

I created these using some paper from the retired True Love paper collection. I added some embossed cardstock to each card using the Floral Lace Embossing Folder and a little bling using the Sparkles.

The sentiments were stamped using M-sized stamp sets which fit perfectly in the 2" circles I cut from coordinating cardstock.


These cards along with others can be found in my shop - here.

I hope you like the cards. Thanks for stopping by!