Thursday, December 30, 2021

My Top 10 from 2021

As 2021 is ending I have been looking back over some of the scrapbook layouts I have done during this year at my Scrapbook with me events and wanted to revisit my Top 10 layouts (in no particular order) from the year. You can follow the link with each one to see the original blog post with more details on each layout.

#10 - January 2021 Recap Layout

Loved the simple design of this layout! Was perfect for using up some scraps of paper and a great way to recap the month. Full details - here.


#9 - April 2018 Recap Layout

Had fun creating this one with the hexagons and faux-stitching. Used up a lot of scraps for this layout! Full details - here!


#8 - Octoberfest Layout

Using up more scraps with this layout from a fun day at Octoberfest. Full details - here.


#7 - June 2021 Recap Layout

Fun working with this sketch. Used 1 piece of double-sided pattern paper and then some sponging to help with the white space in the background. Full details - here.


#6 - Explore More Layout

Loved how this came out and had fun combining Cricut elements along with other embellishments to finish the layout. Full details - here!


#5 - 4th of July Layout

Loved working with the Stars & Sparklers paper in creating this layout and using a combination of stickers and die cut stars to embellish it. Full details - here!


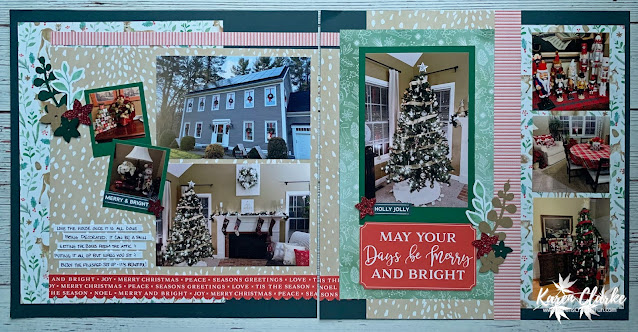
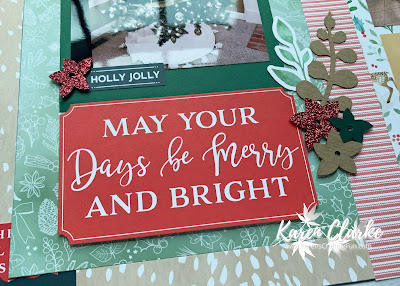
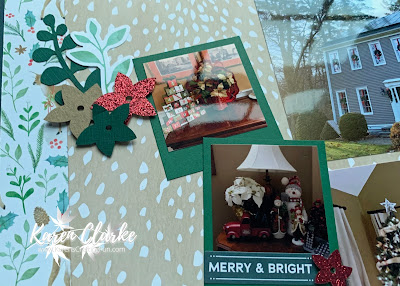
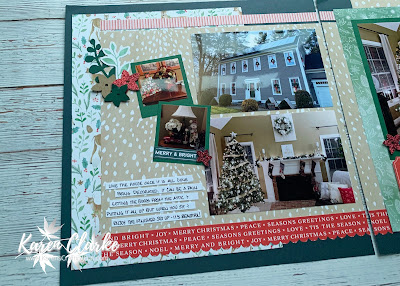
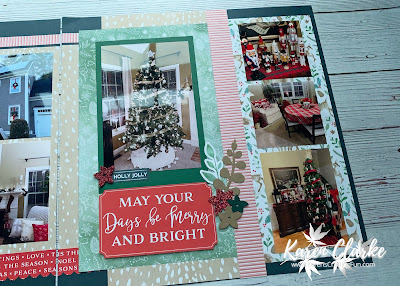
#4 - Christmas 2018 Layout

Loved having the White Pines collection available to create this layout! This paper is always one of my favorites! Full details - here!


#3 - January 2017 Recap Layout

Another layout using up some scraps, this time with the Stella collection. I loved the simplicity of the circles and the use of white space here. Full details - here!


#2 - Express Yourself Layout

I always love layouts where I can document my girls' personalities! Had so much fun creating this one for my kid with the ever-changing hair color! Full details - here!


#1 - Shake Shack Layout

Always fun to document our family traditions and the fun memories that go with them. Full details - here!


I had so much fun creating these layouts during the Scrapbook with me events and am looking forward to even more scrapbooking during 2022. If you are interested in joining me for one of my virtual events make sure to Like and Follow my Facebook Page to get notifications for upcoming events.

Thanks for stopping by and hope to see you in 2022!

Wednesday, December 15, 2021

Christmas Round Treat Box and a Tutorial

Finally got some crafty time today to work on this Christmas Round Treat Box. I had so much fun designing this box and cannot wait to fill them with treats for my coworkers.


 The treat bag uses cardstock for the base and patterned paper for embellishments. I also added a tag and some stamped poinsettias for decoration. I have included a link to a PDF of instructions at the end of this post as well as a process video.

To create this treat box you will need 2 pieces of cardstock and 1 piece of patterned paper. Cut 2 5" circles and 2 5 1/4" circles from one piece of cardstock. Cut a 2 1/2" x 12" strip, a 2 1/2" by 6" strip, a 1 1/2" x 12" strip and a 1 1/2" x 6" strip from the other piece of cardstock.


From the patterned paper cut 1 5" circle, a 1 3/4" x 12" strip, a 1 3/4" x 6" strip, a 3/4" x 12" strip and a 3/4" x 6" strip.


Score the strips along the length at 1/2" then using scissors make "V" shaped cuts to the score line to create tabs on the strips.


Place strong adhesive on the backside of 1 5" and 1 5 1/4" circle along the outer edge and along the back of the other 2 circles. Place strong adhesive on the backside of both 12" strips at the ends.


To create the box bottom use the 5" circles and the 2 1/2" strips. Remove the adhesive backing from the outer edge of one circle and align the score line with the outer edge working around. The 6" strip will be used to fill the gap left by the 12" strip.


Remove the adhesive backing from the other circle and insert it inside the box bottom to cover the tabs and add additional stability to the box.


Follow the same steps to create the box lid using the 5 1/4" circles and the 1 1/2" strips.


Adhere patterned pieces to box lid and base.


Add some stamped elements to embellish. Fill with candy or gifts and share for a fun Christmas treat.


You can download the PDF of instructions here.  This process video walks you through the steps as well.


I hope you like the treat bag. Thanks for stopping by!


Thursday, December 9, 2021

Wonderland OSW Card Workshop

Its fitting that we had our first snowfall today here in Mass as I am sharing with you my latest One Sheet Wonder card workshop featuring the Wonderland collection from Close To My Heart. The wintery-themed papers and stamp set from this collection are perfect for this season. This workshop helps you make 12 cards to send to some warm wishes family and friends.


This workshop creates 12 cards from the 1 sheet of patterned paper plus 6 sheets of cardstock.  This is the cutting diagram for the patterned paper.


The stamped images and sentiments come from the Wonderland Cardmaking Stamp Set + Thin Cuts. I added something fun on each card by using tags die cut with the Tags & Tabs Thin Cuts set. I also added a little bit of shimmer to the stamped images using a Clear Shimmer Brush.

These are the 12 card designs you will be able to create with this workshop.


If you are interested in creating this workshop for yourself or with your customers, there are 4 ways to get the files:

1. Follow the Buy Now link on the bottom of this post. The files are $11.50 (USD). 

2. Place a purchase on my Close To My Heart website for $35 or more (before taxes and shipping).

3. Join the VIP Program from Close To My Heart under me. All my VIPS get FREE access to my workshop files.

4. Join my Close To My Heart team, all team members have access to my workshop files.

Supplies Needed for this Workshop:

    X7274S - Wonderland Paper Pack + Sticker Sheet
    X7274C - Wonderland Coordinating Cardstock
    Z4337 - Wonderland Cardmaking Stamp Set + Thin Cuts
    B1771 - Embroidered Borders Stamp Set
    X254 - White Cards & Envelopes Value Pack
    Z3943 - Circles Thin Cuts
    Z3726 - Tags & Tabs Thin Cuts
    Z4191 - Silver Glitter Gems
    Z2831 - Charcoal Exclusive Inks
    Z2841 - Glacier Exclusive Inks
    Z6532 - Mulberry Exclusive Inks
    Z6514 - Wisteria Exclusive Inks
    Z3293 - Clear Shimmer Brush
 
Here is what you will receive with the workshop files:
  • Welcome Page 
  • Cutting Guide with color photos of the papers and directions for cutting the papers needed
  • Card Guide with supply list and color photos of the completed cards
  • Maker Release
  • Social Media image for you to use in promoting the workshop for your customers
I hope you enjoy creating these cards just as much as I did creating them!

...


Tuesday, December 7, 2021

Holiday Decorating Layout

I had a lot of fun creating this layout during a recent Scrapbook with me event. I wanted to capture the memories of decorating our house for the holidays and the Holly & Ivy collection was perfect for this layout!


The inspiration for this layout came from this sketch from the LetsScrapSketches blog. You can see this sketch along with others here.


I loved how the papers from this collection worked so well with the pictures. I added some stickers from the collection along with the die cuts to embellish the layout.


If you are interested in joining me for any of my events make sure to Like and Follow my Facebook page to get notifications of the upcoming events.

I hope you like the layout. Thanks for stopping by!


Sunday, December 5, 2021

Some more recent layouts

I cannot believe that we are in December now and with just getting through Thanksgiving and the Christmas holiday right around the corner, I have not had time to share many Scrapbook with me layouts recently. I wanted to share a few of the layouts from my Scrapbook with Me events here with you today.

The "Heart Full of Thanks" layout features paper from the Pumpkin Spice collection. I have used this paper quite a bit lately as I am in love with the colors and patterns in it. This collection was perfect for capturing the Thanksgiving memories from this year.


The "Home Away From Home" layout features some retired Mix-In papers. I had fun documenting the dorms that Meghan lived in while a student at Champlain College. The title is a combination of the Slim Alphabet Thin Cuts set and stamped letters featuring the retired Farmhouse Alphabet stamp set. I had fun mixing the fonts in creating this layout.


The "Shake Shack" layout uses papers from the November/December Mix-Ins paper pack along with a title cut using the Slim Alphabet Thin Cuts set. The embellishments are a combination of stars from my stash along with enamel dots from the Black & White Dots set.


I will be sharing more recent layouts in upcoming blog posts so make sure to subscribe to my blog for notifications!

If you are interested in joining me for one of my Scrapbook with Me events, make sure to Like and Follow my Facebook page to get notifications for the upcoming events.

I hope you like the layouts. Thanks for stopping by!


Wednesday, December 1, 2021

Smitten

I know it's only December 1st but it's never too early to do some pre-holiday crafting! The new Smitten special from Close To My Heart is perfect for celebrating the fun side of Valentine's Day and I am so excited to start crafting with it. Before I do I want to share the information on this special with everyone.


This collection features a vibrant color palette with cute, whimsical designs. There is a paper packet, sticker sheet and a stamp set with Thin Cuts available with this collection. You can also save 20% on the Smitten products when you purchase the Smitten Product Bundle or Smitten Workshop Kit.


This special is available now through February 28th. You can see the entire Smitten Collection here on my website today.


Wonderland

Welcome to December everyone! Today I am sharing with you the 2nd collection from the November/December catalog called Wonderland! With the weather here in New England getting colder I am so excited for this collection. I am in love with the soft colors and fun patterns in this collection along with the adorable felt shapes and adorable images.


I love the options with this collection! There are 2 choices for the paper pack - each pack has 6 sheets, 2 each of 3 double-sided designs, you can choose the pack by itself or with a coordinating sticker sheet. In addition to the paper pack there is also a Coordinating Cardstock pack, Felt Shapes, Picture My Life Cards and a Digital Art Collection. If you are also into stamping this collection also offers a scrapbooking stamp set and a cardmaking stamp set.


In addition to the paper packs, stamp sets and embellishments, there are also 2 workshop kits available with this collection. Each workshop kit features exclusive elements that are only available through the kit. Exclusive patterned papers, printed die cuts and cardstock in the scrapbooking workshop kit and an exclusive stamp set with coordinating Thin Cuts in the cardmaking kit.


I hope you are in love with this collection as much as I am! I have been busily creating with this and cannot wait to share the final results with you.

You can see and shop this collection on my website today - here!