Welcome to September! With the start of this month that means that we have 2 things to celebrate - a new Core Catalog and a new Idea Book from Close To My Heart!
I am so excited for the release of these new catalogs and all of the wonderful products that have been added to the Close To My Heart line. The Core Catalog runs from September 1, 2020 through August 31, 2021. The Idea Book will be good from September 1, 2020 to October 31, 2020.
Today I had a chance to craft with one of the new paper collections - Party Time. This collection is from the Core Catalog and contains double sided papers with vibrant colors and images that are perfect for both boy and girl celebrations as well as gender neutral celebrations.
The great thing is that any of these layouts or cards can be changed up to fit your needs with the flexibility of the double-sided patterned paper in this collection!
Click here to see this paper pack and more of the collection today!
Hope you like the layouts and cards! Thanks for stopping by!
Supplies Used: X8016S - Party Time Paper Pack + Sticker Sheet X8016C - Party Time Coordinating Cardstock
Z3779 - Wishing You Everything Stamp Set + Thin Cuts
Had fun creating this layout today during my latest Scrapbook with me event. I have been purposefully trying to scrapbook more about me in my recent layouts so I worked on a layout at this event to document my shoulder surgery.
We used this sketch from the Scrapbook and Cards Today blog. You can see the sketch along with others here.
For this layout I used some paper from a recent Mix-In paper pack and combined it with some paper from the retired Chelsea Gardens paper pack. I added a punched border and then a circle detail created with some enamel dots.
I was excited to use the August Stamp of the Month from Close To My Heart - Floral Celebration - to create the flower embellishments on this layout. I am in love with this set of 20 images and can see so many uses for this set with cards and scrapbook layouts.
You can see this set here on my website. The set is $18.95 for purchase or you can get it for $5.00 with a $50.00 purchase.
I hope you liked the layout. Thanks for stopping by!
Supplies Used: X9015 - Mix-In Paper Pack S008 - August Stamp of the Month: Floral Celebration X6047 - Black Cardstock 1385 - White Daisy Cardstock X6044 - Peach Cardstock Z6509 - Candy Apple Red Exclusive Inks Z2844 - Pixie Exclusive Inks Z6502 - Peach Exclusive Inks
Z2853 - Sweet Leaf Exclusive Inks Z3314 - Black and White Dots Z4221 - Mink Twine
My husband and I have been trying to take some time to get out of the house on the weekends and go for drives or hikes during this pandemic. This past Saturday we took a drive and ended up in Lincoln Massachusetts to do a hike in the Flint's Pond area. As soon as I saw the pictures I knew I had to dive into the Featured Paper Collection from Close To My Heart for the month of August - Timber. I worked on this layout with my group during a Scrapbook with Me session last week and am so happy with how it came out!
We worked from this sketch from the January 2020 Page Maps. You can find this sketch along with others here.
I embellished the layout with stickers from the sticker sheet that comes with the Timber Paper Pack and some chipboard pieces from the Timber Die-Cuts. I tore some paper and inked the edges with Espresso Exclusive inks as well as added some wood arrows and stars to add some flair to the layout.
You can see the whole suite of the Timber Collection here on my website today!
I hope you enjoyed the layout. Thanks for stopping by!
So excited to share with you my most recent scrapbook layout since I know I haven't shared too many here recently (no worries I have lots to share in the coming days). Just finished a Scrapbook with me session with my group and had so much fun creating this layout.
The inspiration for this layout comes from this sketch from the July 2020 double-page challenge from Stick It Down.
You can find this sketch along with lots of other sketches for both cards and scrapbook layouts on the Stick It Down blog - here.
I used some retired paper from Close To My Heart for the layout along with some miscellaneous buttons from my stash - I am continuing to work towards my personal challenge of using up my own stash of supplies.
I cut the title using the Cricut and the font from the Close To My Heart Artbooking image set.
You can see this font as well as the other images from this collection on my Cricut Affiliate link - here.
One habit I have in my scrapbooking is when adding embellishments I add them in groupings of three. I did that on this layout with the buttons at the title banner, on the bottom of the left page and again on the right page to balance it out.
Adding extra photos, hidden photos or hidden journaling to a scrapbook layout can be fun! At my most recent Scrapbook with me event with my group I demonstrated how to add a Pop & Twist interactive element to a layout to add those extra photos or journaling. I promised my group I would do a process video and provide them with some additional details which I have and I am sharing that here with you all.
We had fun working on our layouts from this sketch from the Close To My Heart blog. You can find this sketch and others here.
I learned this technique from a group I am part of on Facebook and was so excited to pass it on. To create the element you will need the following:
- 3 pieces of cardstock - 1 @ 4" x 12", 1 @ 3 1/2" x 10" and 1 @ 3 1/2" x 8"
- a scoring platform or ruler with a stylus or a scoring blade on your trimmer
- a strong adhesive that is good for paper crafting
- a bone folder to burnish your creases
- a pencil
- a ruler
Score the 4" x 12" (card base) piece at 6". Fold along crease and set aside.
Score the 3 1/2" x 10" piece (pop-up piece) at 2 1/2", 5" and 7 1/2".
Fold creases as shown so center (5") crease is a mountain fold and the other 2 are valley folds.
Score the 3 1/2" x 8" piece (mechanism) at 1 3/4" along the length. Fold along crease.
Along the width of this piece, mark with a pencil at 2 1/4" and 5 3/4" on both sides.
Score an "X" across the piece going from top to bottom at the pencil marks.
Fold along the creases and burnish the folds.
Fold inwards to create an "arrow".
Place adhesive at point of arrow on both sides and adhere to backside of card base piece just below fold.
When you open it back up - this is what you have.
Put adhesive on outer 1" on top right and bottom left.
Adhere pop-up piece to the mechanism. Make sure to let the pop-up piece overhang the mechanism by about 3/4"
Now you can add your photos or journaling to the pop and twist element. Sizes are 3 3/4" x 3 3/4" and 2 1/4" x 3 1/4".
When you adhere this to your layout make sure to use strong adhesive. You can secure it closed by using some ribbon or twine, like I did in my layout, or a velcro dot or even a tab to tuck it under.
I have detailed the process in this video so you can see this done step by step.
If you want to join my twice weekly Scrapbook with me events. Head on over to my Facebook Page to follow me and you will get notifications when I schedule any upcoming ones!
I hope you liked the layout and enjoyed learning about the technique! Thanks for stopping by!
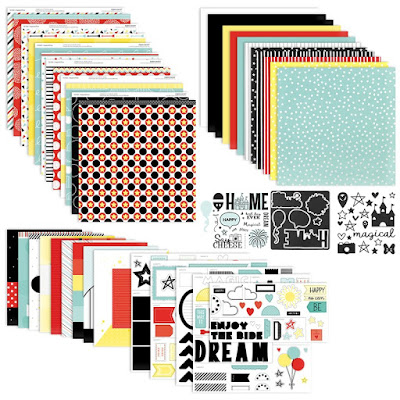
What do you think of when I say the Happiest Place? It could be your home, a favorite local spot or just anywhere you are with family. For me it brings up memories of vacations in Florida at Walt Disney World - definitely one of my happy places. Close To My Heart has introduced a special collection this month dedicated to celebrating our happiest places.
The Happiest Place collection includes a whole suite of coordinating products, including an extra-large paper packet with 12 patterned paper sheets! Your projects will shine thanks to silver glitter foil accents on coordinating stickers and cardstock sheets. Add in stamps, acrylic shapes, SVG’s, and an 8½″ × 11″ Cut Above Layout Kit, and you have the recipe for hours of unforgettable crafting fun!
CC7201 Happiest Place Paper Pack + Sticker Sheet or CC7202 Happiest Place Paper Pack (without sticker sheet)
CC7203 Happiest Place Coordinating Cardstock
CC7204 Happiest Place Acrylic Shapes
CC7205 Happiest Place Stamp Set or CC7206 Happiest Place Stamp Set + Thin Cuts
Looking for a quick and easy way to document your Happiest Place memories? The Happiest Place Cut Above Kit contains base pages, die-cuts, stickers, pre-cut paper pieces, photo placeholders, printed instructions and Flip Flap Memory Protectors - everything you need to create a 16-page 8 1/2" x 11" album.
CC7208NP Happiest Place Cut Above Kit (without Memory Protectors)
You can purchase each of these products individually on my website or together in the Happiest Place Bundle for a savings of 20%.
CC7209 Happiest Place Product Bundle
In addition to these fantastic products, Close To My Heart has 2 different digital art collections. These exclusive designs coordinate perfectly with the Happiest Place Collection. The Digital Art Titles Collection contains 5 SVG files perfect for layout titles or use them with our heat transfer vinyl to decorate the cover of your album. The Digital Art Designs Collection contains 20 SVG files to easily accent your layouts or cards.
CC7207 Happiest Place Digital Art Titles
CC72010 Happiest Place Digital Art Designs
This collection is available for a limited time - only through August 31st. So be sure to take advantage of this special today! You can see the entire Happiest Place Collection here on my website today.